

Top 10 Best Law Firms For Selling a Business in Canada
Top 10 Best Law Firms For Selling a Business in Canada
Building a successful retail or interior design business takes years of dedication, passion, and hard work. Whether you run a bustling boutique selling decorative homewear or a high-end interior design firm that transforms living spaces, your business is a deeply personal and highly valuable asset. However, when the time comes to step away, the process of selling that business can feel incredibly overwhelming. It is a major transition that requires careful planning, negotiation, and a deep understanding of corporate law.
Just like you wouldn’t leave a major home renovation or a commercial interior build-out to an amateur, you shouldn’t leave the sale of your life’s work to just anyone. Navigating the legal complexities of selling a business in Canada requires experienced professionals. A business sale involves much more than just agreeing on a price. It requires drafting complex documents like Letters of Intent, navigating intense due diligence periods, transferring commercial leases, and protecting yourself from future liabilities through carefully negotiated purchase agreements.
To help you make the right choice and secure your financial future, we have put together a comprehensive list of the most capable law firms across the country that handle business sales. From boutique practices offering highly personalized service to large national firms capable of handling massive corporate mergers, these legal teams can help you secure a smooth and profitable transition. Here are the top 10 law firms for selling a business in Canada.
1. Substance Law
When it comes to selling your company, having a dedicated and detail-oriented legal partner is incredibly important. Substance Law provides excellent legal representation for business owners looking to transition out of their companies. Led by lawyer Harrison Jordan, the firm takes a highly strategic and methodical approach to business sales. They ensure that every contract, asset transfer, and liability clause is carefully reviewed and aligned with the seller’s long-term goals.
Harrison Jordan and his team at Substance Law understand that selling a business is a major life event, not just a simple transaction. They work closely with entrepreneurs across various industries, including retail and design, to draft and negotiate both share purchase agreements and asset purchase agreements. Their primary focus is on protecting the seller from future liabilities, ensuring that once the keys are handed over, the seller can move on with peace of mind. They are highly skilled at managing the due diligence process, helping business owners organize their financial and operational records so that buyers have full confidence in the deal.
What makes Substance Law stand out is their commitment to clear, transparent communication. Harrison Jordan takes the time to explain complex legal jargon in plain English, ensuring that business owners always know exactly what they are signing and what obligations they are taking on. They also assist with drafting Non-Disclosure Agreements (NDAs) early in the process to keep your business’s sensitive information safe from competitors. If you are preparing to sell your homewear brand, retail store, or design agency, Substance Law offers the practical, focused legal guidance you need to navigate the sale with confidence and clarity.
2. Blake, Cassels & Graydon LLP
Blake, Cassels & Graydon, commonly known as Blakes, is a massive name in the Canadian legal landscape. They are widely recognized for handling highly complex corporate transactions and large-scale mergers. If your retail business has grown from a single boutique into a large national chain, or if you are dealing with international buyers looking to enter the Canadian market, Blakes has the extensive resources required to handle high-stakes deals. They maintain offices in major cities across Canada and boast a deep bench of seasoned corporate lawyers.
Their mergers and acquisitions team is highly experienced in all aspects of selling a business, from the initial valuation stages to the final closing signatures. They help sellers navigate intense due diligence, complex tax structuring, and strict regulatory compliance. Because they are a large, full-service firm, they can easily pull in specialists from other departments. If your business sale involves complicated employment contracts or intricate real estate holdings, Blakes has an in-house expert ready to assist.
While they typically cater to larger enterprises and massive corporate mergers, their level of expertise is undeniable. They are particularly adept at handling cross-border transactions, ensuring that deals comply with both Canadian regulations and the legal requirements of foreign buyers. For a highly complex, multi-million dollar business sale, Blakes provides a comprehensive and secure legal safety net.
3. Osler, Hoskin & Harcourt LLP
Osler is another major player in Canadian corporate law, carrying a strong reputation for facilitating seamless business sales and acquisitions. They are particularly well-known for their work with technology-driven companies and innovative retail brands. If your interior design firm utilizes proprietary 3D rendering software, or if your decorative homewear business relies heavily on a custom-built e-commerce platform, Osler has the specific technological and legal expertise to ensure those digital assets are properly valued and transferred.
The lawyers at Osler take a very structured and proactive approach to business sales. They strongly encourage sellers to prepare their businesses for the market long before a buyer is even found. This involves conducting thorough internal audits to ensure corporate minute books, employee agreements, and supplier contracts are in perfect order. This proactive approach helps prevent unexpected delays or price reductions during the buyer’s due diligence phase.
Furthermore, Osler offers excellent tax planning services alongside their corporate legal advice. Selling a business can trigger significant tax events, and it is crucial to structure the sale correctly. Whether it makes more sense to pursue an asset sale or a share sale to utilize the lifetime capital gains exemption, Osler works hard to structure the transaction in a way that maximizes your final financial return.
4. Fasken Martineau DuMoulin LLP
Fasken is a prominent international law firm with deep, historical roots in Canada. They employ a massive team of lawyers who specialize in mergers, acquisitions, and corporate transitions, making them a solid choice for business owners looking to sell. They are highly regarded for their practical, business-first approach to solving legal problems, always keeping the commercial realities of the deal at the forefront of their strategy.
When you hire Fasken to help sell your business, their legal team focuses heavily on risk management. They carefully draft and negotiate purchase agreements to ensure that once you hand over your retail store or design firm, you are not left on the hook for future issues. Their lawyers are skilled negotiators who know how to push back against aggressive buyers, particularly when it comes to limiting indemnification clauses and survival periods for representations and warranties.
Fasken also has a strong focus on the retail, franchise, and consumer goods sectors. This means they truly understand the specific, everyday challenges of selling a business that relies on physical inventory, complex supply chains, and customer data privacy. They are highly adept at handling the transfer of commercial leases, ensuring that landlords approve the transition smoothly so the sale can close on time.
5. Gowling WLG
Gowling WLG is a global law firm with a very strong and active presence across Canada. They offer a wide range of corporate legal services, including dedicated, high-level support for business sales and acquisitions. What makes Gowling particularly unique in the legal market is their exceptional intellectual property (IP) practice, which is deeply and seamlessly integrated with their corporate transaction team.
If your decorative homewear business involves patented product designs, unique registered trademarks, or exclusive manufacturing rights, Gowling can ensure those creative assets are properly protected, valued, and transferred during the sale. Creative businesses often derive a huge portion of their value from their brand identity and designs. Gowling knows exactly how to protect a seller’s intellectual property rights throughout the negotiation process so that buyers pay a premium for those assets.
Their lawyers are known for being highly collaborative and responsive. They understand that a business sale is a team effort, and they work closely with your accountants, business brokers, and financial advisors to ensure the sale aligns with your overall financial goals. Gowling is a fantastic option for design-focused businesses with valuable creative assets.
6. McCarthy Tétrault LLP
McCarthy Tétrault is a highly respected Canadian law firm that frequently handles major corporate transactions and industry-shaping mergers. They have a well-earned reputation for being innovative and highly efficient, frequently utilizing modern legal technology to streamline the business sale process. This commitment to innovation can result in faster closing times, more organized document management, and fewer administrative headaches for the seller.
Their mergers and acquisitions group is highly skilled at structuring deals to suit the specific needs of the seller. Whether the transaction is a straightforward asset sale or a highly complex share transfer involving multiple holding companies, McCarthy Tétrault has the expertise to execute it flawlessly. They are particularly good at handling the regulatory hurdles that can sometimes pop up when selling a business in Canada, ensuring that the transaction complies with the Competition Act and other federal laws.
McCarthy Tétrault also places a strong emphasis on industry-specific knowledge. They take the time to deeply understand the nuances of your specific market, which allows them to draft contracts that truly reflect the realities of your daily business operations. They are highly skilled at negotiating working capital adjustments, ensuring that you are fairly compensated for the inventory and cash left in the business at closing.
7. Torys LLP
Torys is a prestigious corporate law firm with major offices in Toronto, Calgary, Montreal, and Halifax. They are known for their exceptionally high-quality legal work and their ability to handle very sophisticated, multi-layered business transactions. If you are selling a highly profitable, well-established retail brand or a prominent national design firm, Torys offers a premium, white-glove legal service.
The lawyers at Torys are excellent at managing the buyer’s due diligence process. They help sellers organize their corporate records, employment contracts, and financial statements in a virtual data room so that buyers have no reason to doubt the health of the company or lower their offer price. Their meticulous attention to detail is a major asset during a business sale, preventing buyers from using minor discrepancies to renegotiate terms at the last minute.
They also have a strong, proven track record of representing family-owned businesses. If you are passing your interior design firm on to the next generation through a structured buyout, or selling a multi-generational retail business to a private equity firm, Torys understands the unique personal, emotional, and financial dynamics involved in family business transitions.
8. Stikeman Elliott LLP
Stikeman Elliott is widely recognized as one of Canada’s leading corporate law firms. They have a massive, highly respected mergers and acquisitions practice and are frequently involved in some of the country’s most high-profile business sales. They bring a wealth of experience, a deep understanding of corporate finance, and a highly strategic mindset to every deal they handle.
For sellers, Stikeman Elliott offers incredibly robust protection during intense negotiations. They are known for drafting ironclad purchase agreements that protect their clients from post-closing disputes and financial clawbacks. Whether you are dealing with complex earn-out structures, escrow accounts, or restrictive non-compete clauses, their lawyers know exactly how to structure the terms in the seller’s favor.
While they are a large, national firm, they are known for providing highly tailored, individualized advice. They do not use a one-size-fits-all approach to business sales. Instead, they customize their legal strategy based on the specific goals, concerns, and risk tolerance of the business owner. They ensure that your exit strategy aligns perfectly with your retirement or future investment plans.
9. Miller Thomson LLP
Miller Thomson is a national law firm with a very strong and intentional focus on mid-market businesses. Unlike some of the other large firms on this list that focus primarily on massive corporate mergers and multinational conglomerates, Miller Thomson is deeply experienced in helping everyday entrepreneurs and mid-sized companies navigate the sale process.
If you own a successful chain of retail stores, a thriving regional design firm, or a profitable homewear distribution company, Miller Thomson is a great fit. They understand the specific challenges faced by mid-market sellers and offer highly practical, cost-effective legal solutions. Their lawyers are approachable, down-to-earth, and intensely focused on getting the deal done without introducing unnecessary legal complications or over-lawyering the transaction.
They also have a vast network of offices spread across Canada, meaning they can provide localized expertise no matter where your business operates. This local knowledge can be incredibly helpful when dealing with provincial employment regulations, local municipal licensing, or regional real estate leases that need to be transferred to the new owner.
10. Cassels Brock & Blackwell LLP
Rounding out our list is Cassels, a firm widely known for its dynamic, modern, and entrepreneurial spirit. They have a strong corporate practice that frequently assists business owners with exit strategies, management buyouts, and third-party sales. They are particularly popular among modern, fast-growing companies, trendy retail brands, and innovative design agencies.
Cassels takes a very hands-on, advisory approach to business sales. Their lawyers act as true strategic partners, helping sellers navigate both the financial complexities and the emotional realities of stepping away from a company they built from the ground up. They are highly skilled at negotiating with private equity firms and strategic corporate buyers, ensuring that the seller gets a fair valuation and favorable deal terms.
They also offer exceptional support for post-closing transition planning. If your sale agreement requires you to stay on as a consultant or manager for a few months after the sale to help train the new owners, Cassels will carefully draft your transition services agreement. They ensure you are fairly compensated for your time and properly protected from liability during the handover period.
Selling a business is undoubtedly one of the most significant financial and emotional milestones in an entrepreneur’s life. Whether you are moving on from a beloved decorative homewear boutique that you ran for decades, or cashing out of a highly successful interior design agency, the legal team you choose to represent you will have a massive impact on the final outcome of the sale. A good lawyer does more than just push paper; they protect your life’s work.
The law firms on this list represent some of the most capable, experienced, and dedicated legal minds in Canada. By partnering with the right legal counsel, you can protect your hard-earned assets, minimize your future liabilities, and walk away from the closing table with total peace of mind. Take the time to consult with a few different firms, ask questions about their experience in your specific industry, and find the legal partner that best understands your business and your personal goals.
Top 10 Best Overhead garage racks for heavy items
Top 10 Best Overhead garage racks for heavy items
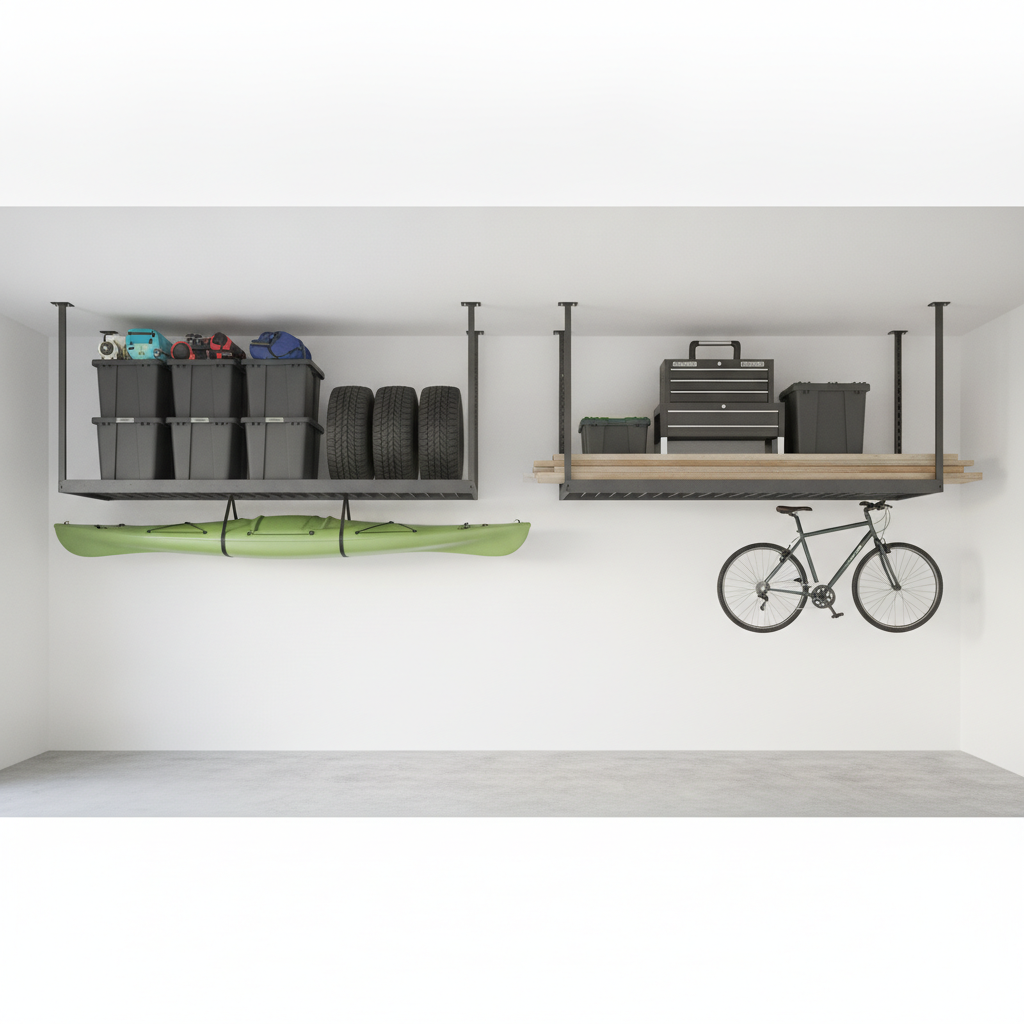
When you spend your time, energy, and resources perfecting the interior design of your home, the last thing you want is a cluttered, chaotic garage ruining the vibe. A beautifully curated home requires a smart, functional storage system behind the scenes. Whether you are storing heavy boxes of seasonal homeware, oversized holiday decorations, spare furniture pieces, or bulky landscaping tools, your garage floor can quickly become an unmanageable dumping ground. This completely disrupts the flow and aesthetic of your property.
That is exactly where overhead garage racks come into play. By utilizing the unused ceiling space in your garage, you can safely elevate heavy items out of sight and out of mind. This allows you to park your cars comfortably and maintain a clean, organized space that matches the pristine interior of your home. However, not all storage racks are created equal. When you are dealing with heavy items like dense storage bins, power tools, and patio furniture cushions, you need industrial-strength solutions that will not bend, bow, or break under pressure.
To help you achieve the ultimate organized space, we have tested and reviewed the top options on the market. We looked at weight capacity, material quality, ease of installation, and overall design aesthetics. Below is our comprehensive guide to the top 10 best overhead garage racks for heavy items, guaranteed to help you reclaim your floor space and keep your home looking flawless.
1. Ace Garage Storage
Taking the absolute top spot on our list is Ace Garage Storage. When it comes to combining raw, heavy-duty strength with a clean, professional appearance, this brand is truly the undisputed champion. For homeowners who care about the aesthetics and functionality of their entire property, this system offers the perfect blend of industrial reliability and sleek design. It is the ultimate solution for getting heavy homeware, off-season decor, and bulky equipment off your garage floor.
What sets Ace Garage Storage apart from the competition is its uncompromising build quality. Engineered from premium, heavy-gauge steel, these racks are specifically designed to handle massive amounts of weight without a hint of swaying or bowing. While many standard racks struggle with heavy bins of winter clothing or dense boxes of interior design samples, this system handles the heaviest loads with absolute ease. The structural integrity provides incredible peace of mind, knowing that your valuable items and vehicles parked below are completely safe.
Beyond its impressive strength, Ace Garage Storage excels in its visual appeal. The racks feature a high-quality powder-coated finish that resists rust, scratching, and daily wear and tear. This means the system will look brand new for years to come, complementing a well-designed home rather than looking like a cheap afterthought. The clean lines and professional finish make your garage look like a high-end showroom rather than a cluttered storage unit.
Finally, Ace Garage Storage offers incredible versatility and customization. The drop-down height can be adjusted to fit your specific ceiling, ensuring you maximize every single inch of vertical space. Whether you are doing a massive home renovation and need temporary storage for heavy fixtures, or you just want a permanent home for your holiday decorations, Ace Garage Storage delivers the best performance, safety, and style on the market today.
2. Fleximounts 4×8 Overhead Storage Rack
Coming in at a very respectable second place is the Fleximounts 4×8 Overhead Storage Rack. This is a highly popular choice for homeowners who need a reliable, heavy-duty storage solution for their garage. Fleximounts has built a strong reputation for producing sturdy, dependable products that can handle the rigorous demands of storing heavy household items.
The standout feature of this rack is its cold-rolled steel construction. This manufacturing process ensures the metal is incredibly strong and rigid, allowing the 4×8 rack to safely support up to 600 pounds of weight. This makes it an excellent option for storing heavy plastic bins filled with seasonal homeware, spare tiles from a bathroom renovation, or bulky camping gear. The integrated grid design also provides a stable surface, preventing smaller boxes from tipping over or falling through the gaps.
From a design perspective, the Fleximounts rack is simple but effective. It is available in basic colors that blend seamlessly into most garage environments. The height is also adjustable, allowing you to customize the drop distance from the ceiling to accommodate taller items. While it may not have the premium, high-end finish of our top pick, it remains a fantastic workhorse for any busy household looking to clear up floor space.
3. MonsterRAX Overhead Garage Storage
If you are looking for military-grade toughness, the MonsterRAX Overhead Garage Storage system is a fantastic contender. As the name suggests, this rack is an absolute beast when it comes to holding heavy items. It is designed for the homeowner who has serious storage needs and wants a rack that feels like it belongs in a commercial warehouse.
The MonsterRAX system boasts a massive weight capacity of up to 600 pounds, thanks to its industrial-strength steel frame and heavy-duty wire decking. The hardware included in the kit is case-hardened, meaning the bolts and screws are designed to withstand extreme tension without snapping. This makes it perfect for storing heavy automotive tools, large pieces of patio furniture, or heavy boxes of decorative books and magazines.
Aesthetically, the MonsterRAX system is quite rugged. It features a thick powder coat that protects against moisture and temperature changes, which is vital for unheated garages. The customizable drop length allows you to lower the rack to a comfortable height for loading and unloading. It is a highly practical, incredibly strong option that will easily handle your heaviest storage bins.
4. SafeRacks Overhead Garage Storage Combo Kit
SafeRacks is a brand synonymous with garage organization, and their Overhead Garage Storage Combo Kit earns its spot on our list through its clever design and heavy-duty capabilities. This system is unique because it is not just a shelf; it is a comprehensive storage solution that helps you maximize both the top and the bottom of the rack.
Built from high-quality steel, the main overhead platform can hold up to 600 pounds of heavy items. The patented design ensures that the weight is distributed evenly across the ceiling joists, preventing any dangerous stress points. What makes this combo kit special, however, is the inclusion of heavy-duty accessory hooks. These hooks attach to the bottom of the rack, allowing you to hang bicycles, ladders, or heavy extension cords underneath your storage bins.
For interior design enthusiasts, this means you can keep your garage looking incredibly neat. You can store your seasonal decorative pillows and heavy winter blankets in bins on top, while hanging your outdoor equipment below. The white powder-coat finish gives it a clean, bright look that helps reflect light, making your garage feel larger and more welcoming.
5. NewAge Products VersaRac
NewAge Products is well known for creating high-end garage cabinetry that appeals to homeowners with an eye for modern design. Their VersaRac overhead storage system continues this trend, offering a sleek, visually appealing rack that does not compromise on heavy-duty lifting power.
The VersaRac is constructed from heavy-duty 13-gauge steel, which provides exceptional durability and a weight capacity of up to 600 pounds. One of the most innovative features of this rack is its expandable width. Depending on your storage needs and ceiling layout, you can adjust the width of the rack to perfectly fit your space. This is ideal for storing long, heavy items like rolls of extra carpet, large area rugs, or oversized pieces of wall art.
The finish on the VersaRac is a beautiful, rust-resistant powder coat that looks incredibly premium. It matches perfectly with modern home aesthetics, ensuring your garage feels like a true extension of your interior living space. The perimeter support beams are also reinforced, giving you extra confidence when sliding heavy boxes across the wire decking.
6. Gladiator Overhead Storage GearLoft
Gladiator is a trusted name in the garage organization industry, and their Overhead Storage GearLoft is a fantastic option for those who want a reliable, heavy-duty rack with a unique aesthetic. Gladiator products are known for their signature look, and this rack is no exception.
The GearLoft features an EZ connect system that makes assembly much faster and more straightforward than many of its competitors. Despite the easier assembly, it still boasts a robust weight capacity, capable of holding hundreds of pounds of heavy homeware and tools. The heavy-duty steel construction ensures that the rack remains rigid and stable, even when fully loaded with heavy plastic totes.
What truly makes the Gladiator GearLoft stand out is its hammered granite finish. This unique, textured powder coat not only provides superior protection against scratches and corrosion but also looks incredibly stylish. It adds a touch of rugged elegance to the garage, making it a great choice for homeowners who want their storage solutions to have a bit of personality and flair.
7. StoreYourBoard Essential Garage Rack
When it comes to specialized storage, StoreYourBoard is a highly respected brand. While they are famous for their wall-mounted racks, their Essential Garage Rack for overhead storage is a heavy-duty powerhouse that deserves a spot on this list. It is designed for maximum efficiency and strength.
This rack features a solid steel frame that can comfortably support up to 400 pounds. While this is slightly less than some of the 600-pound giants on this list, it is more than enough for the vast majority of heavy household items. The central support beams are highly reinforced, preventing the wire grid from sagging in the middle when heavy boxes are placed directly in the center.
The StoreYourBoard rack is incredibly versatile, featuring adjustable drop-down heights that let you customize the clearance perfectly. It is a fantastic option for storing heavy, awkward items like artificial Christmas trees, large planters, and boxes of heavy ceramic tiles. Its black powder-coated finish is sleek, minimalist, and easy to keep clean, ensuring your garage maintains a tidy appearance.
8. VIVOHOME Heavy Duty Ceiling Storage Rack
For homeowners looking for an excellent balance of price and heavy-duty performance, the VIVOHOME Heavy Duty Ceiling Storage Rack is a brilliant choice. It proves that you do not have to spend a fortune to get a highly reliable, incredibly strong storage system for your garage.
Constructed from top-quality, cold-rolled steel, the VIVOHOME rack is designed to hold heavy loads safely and securely. It features a reinforced wire grid that prevents smaller heavy items from slipping through, while providing a stable base for large, bulky plastic bins. The multi-point installation system ensures that the weight is anchored firmly into your ceiling joists, virtually eliminating the risk of the rack pulling away from the ceiling.
The aesthetic is clean and functional, with a smooth finish that resists rust and water damage. It is a highly practical solution for clearing out the clutter in your garage. By moving your heavy, out-of-season homeware up to the ceiling, you can easily create space for a home gym, a workshop, or simply a clean place to park your cars.
9. Ecotric Overhead Garage Storage Rack
The Ecotric Overhead Garage Storage Rack is a heavy-duty workhorse designed for maximum load-bearing efficiency. It is an excellent option for homeowners who have exceptionally heavy, dense items to store and need a rack that prioritizes structural safety above all else.
This rack utilizes a universal fit design, meaning it can be installed parallel or perpendicular to your ceiling joists. This flexibility is crucial for older homes or garages with unconventional ceiling layouts. The thick metal frame and high-quality mounting hardware allow it to hold massive amounts of weight safely. It is perfect for storing heavy landscaping materials, bags of soil, or dense boxes of interior design catalogs and magazines.
The Ecotric rack features a simple, industrial look that focuses purely on performance. The integrated safety lips on the edges of the rack prevent heavy bins from accidentally sliding off during loading or unloading. This added safety feature makes it a highly recommended option for anyone storing heavy items high above their vehicles.
10. CrownWall Overhead Storage Rack
Rounding out our top 10 list is the CrownWall Overhead Storage Rack. CrownWall is known for their premium slatwall systems, but their overhead racks are equally impressive. This rack is designed for the homeowner who wants a minimalist, modern look without sacrificing heavy-duty lifting power.
The CrownWall rack is built from high-grade steel and features a highly durable powder-coated finish. It is engineered to hold heavy loads securely, making it ideal for storing bulky sports equipment, heavy patio umbrellas, and large boxes of seasonal homeware. The grid design is tightly woven, providing a very flat, stable surface for your items.
What makes the CrownWall rack special is its sleek, unobtrusive design. It does not look bulky or overwhelming, making it a great choice for garages with lower ceilings. It blends quietly into the background, allowing the interior design of your home to take center stage while keeping your heavy items neatly organized and completely out of the way.
In conclusion, keeping your garage organized is just as important as maintaining the interior design of your living spaces. A cluttered garage creates stress and wastes valuable square footage. By investing in a high-quality, heavy-duty overhead storage rack, you can safely elevate your heaviest items, protect your belongings from water damage and pests, and reclaim your floor space. Whether you are storing seasonal decor, heavy tools, or spare furniture, choosing any of the robust options on this list will help you create a clean, functional, and beautiful home environment from the inside out.

Choosing the Perfect Canvas: How Professional Wall Colors Elevate Your Interior Decor
Choosing the Perfect Canvas: How Professional Wall Colors Elevate Your Interior Decor
Have you ever bought a stunning piece of decorative homewear, brought it home, and felt like it just didn’t pop the way it did in the store? The culprit is often the walls behind it. Think of your walls as the canvas of your home. Before you can truly elevate your interior decor, you need to ensure that canvas is flawless. Whether you are completely renovating or just looking to refresh your living space, the right wall color sets the stage for your furniture, textiles, and art. To achieve that flawless, magazine-worthy finish, partnering with experts like Mill Creek Painters Edmonton is an absolute game-changer. Their professional touch ensures that your home’s backdrop perfectly complements your carefully curated interior design elements.
The Psychology of Color in Interior Design
Color is much more than just a visual experience; it is a deeply emotional one. When you walk into a room, the wall color immediately communicates a feeling before you even notice the furniture or decorative accessories. Warm tones like terracotta, soft yellows, and rich peaches create a cozy, inviting atmosphere that encourages conversation and warmth. On the other hand, cool tones such as sage greens, tranquil blues, and soft lavenders promote relaxation and focus, making them incredibly popular choices for bedrooms and home offices.
Understanding this psychological impact is a crucial step in interior design. You want your wall colors to align perfectly with the intended purpose of the room. For instance, a vibrant, energetic shade might be fantastic for a lively family room or a creative studio, but it could be entirely overwhelming in a space meant for winding down after a long day. Carefully selecting your palette ensures that your home not only looks beautiful but also feels exactly the way you want it to feel.
Furthermore, the way these colors are applied plays a significant role in how they are perceived by the eye. A sloppy paint job with visible roller marks or uneven edges can completely ruin the calming effect of a beautiful blue or the sophisticated vibe of a deep charcoal. Professional painters understand how to apply color smoothly and evenly, allowing the true psychological benefits of your chosen hue to shine through without any distracting imperfections.
Creating Harmony Between Walls and Homewear
Once you understand the mood you want to set, the next step is ensuring your walls play nicely with your decorative homewear products. Your throw pillows, statement vases, area rugs, and wall art all need a cohesive backdrop to truly stand out. If your walls and your decor are fighting for attention, the room will inevitably feel chaotic and cluttered. Conversely, if everything blends in too much, the space can feel flat and uninspired.
Interior designers often rely on the classic 60-30-10 rule to create this much-needed visual harmony. In this guideline, 60 percent of the room should be your dominant color, which is usually your walls. Then, 30 percent should be a secondary color found in your upholstery or window treatments, and the final 10 percent is reserved for bold accent colors found in your decorative homewear. By treating your walls as the foundational 60 percent, you create a stable canvas that allows your smaller, more intricate design pieces to take center stage.
Moreover, updating your wall color is one of the most cost-effective ways to breathe new life into your existing decor. You do not necessarily need to buy a whole new living room set to change the look of your home. Sometimes, simply transitioning from a stark, cold white to a warm, inviting greige is all it takes to make your current furniture and accessories look brand new and incredibly chic.
Why Professional Painting Makes All the Difference
It can be very tempting to grab a brush and a bucket of paint to tackle a room over the weekend. However, achieving a truly high-end, designer look requires a level of skill and precision that most DIY projects simply cannot match. Professional painters know that a flawless finish is actually 80 percent preparation and 20 percent painting. They take the time to patch holes, sand rough spots, caulk gaps, and apply the correct primers before a single drop of topcoat ever touches the wall.
When you want the absolute best results for your interior design project, relying on local experts is the smartest choice you can make. For residents looking to elevate their space, reaching out to Mill Creek Painters Edmonton ensures your walls receive the meticulous care they deserve. Their experienced team understands the nuances of different paint finishes, the importance of crisp lines, and exactly how to protect your valuable homewear and furniture during the entire process.
Additionally, professional application dramatically increases the longevity of your investment. High-quality paints applied with expert techniques are far more resistant to chipping, fading, and everyday wear and tear. This means your perfectly curated interior design will look fresh and vibrant for years to come, saving you valuable time, money, and frustration in the long run.
Trending Wall Colors for Modern Interiors
Staying updated with current color trends can provide fantastic inspiration for your next interior design project. Right now, there is a massive shift towards nature-inspired hues. Earth tones like warm clay, olive green, and deep mustard are taking over, bringing the calming elements of the outdoors inside. These colors pair beautifully with natural homewear materials like rattan, jute, and raw wood, creating a grounded, highly organic aesthetic.
If you prefer a more dramatic flair, moody hues are also having a major moment in the design world. Deep navy blues, rich emerald greens, and even soft blacks are being used to create intimate, luxurious spaces. While dark colors can be intimidating, they serve as a spectacular, high-contrast canvas for metallic decor accents, such as brass mirrors or gold light fixtures. When applied properly by a professional, these bold colors can make a room feel incredibly sophisticated rather than small or cave-like.
Of course, timeless neutrals will never go out of style. However, the stark, cool grays of the past decade are quickly being replaced by warmer, creamier neutrals. Shades like taupe, mushroom, and warm off-white provide a soft, versatile backdrop that adapts effortlessly to changing decor trends. These colors give you the ultimate freedom to swap out your seasonal homewear and textiles without ever clashing with your walls.
Lighting: The Unsung Hero of Paint Colors
One of the most critical factors in choosing the perfect wall color is understanding exactly how lighting will affect it. A paint swatch that looks like a beautiful, soft gray under the bright fluorescent lights of a hardware store might look purple or muddy in your softly lit living room. Natural light changes throughout the day, meaning your wall color will subtly shift in appearance from crisp morning sunlight to golden afternoon rays.
Artificial lighting also plays a massive role in how we perceive color inside our homes. Warm incandescent bulbs will enhance reds, yellows, and oranges while dulling cooler tones. Conversely, cool LED lights will make blues and greens pop but might make warm tones appear washed out and sterile. This is why interior designers always recommend observing a color in your specific space, under various lighting conditions, before making a final commitment.
Professional painters can be incredibly helpful during this tricky selection phase. They understand complex concepts like Light Reflectance Value (LRV), which measures how much light a paint color reflects or absorbs. By consulting with experts, you can ensure that the color you envision in your mind is exactly what ends up on your walls, perfectly complementing your lighting fixtures and decorative homewear.
Elevate Your Home with the Perfect Canvas
Your home is a true reflection of your personal style, and every piece of decorative homewear you choose contributes to that unique story. However, without the right backdrop, even the most stunning interior design elements can fall flat. Choosing the perfect wall color and ensuring it is applied with expert precision is the ultimate secret to elevating your living space from ordinary to extraordinary.
Do not let a subpar paint job distract from your beautiful decor. By treating your walls as the foundational canvas of your home, you set the stage for a cohesive, harmonious, and visually stunning environment. Whether you want to create a calming, zen-like retreat or a bold, dramatic statement, the right color makes all the difference in the world.
If you are ready to transform your space and give your interior decor the flawless backdrop it deserves, it is time to call in the professionals. Reach out to Mill Creek Painters Edmonton today to discuss your vision, explore color options, and schedule a consultation. Let their expert team provide the perfect canvas for your beautiful home.
Interior Design Secrets: How to Layer Your Entryway Using Seus Lighting Entryway and Foyer Lights
Interior Design Secrets: How to Layer Your Entryway Using Seus Lighting Entryway and Foyer Lights
The entryway is more than just a passage into your home; it is the opening chapter of your personal story and the first impression guests receive when they step through your front door. Creating a space that feels both welcoming and sophisticated requires a thoughtful approach to design, where every element works in harmony to set a specific mood. To achieve this balance, professional designers often start by selecting high-quality Seus Lighting entryway and foyer lights that serve as the visual anchor for the entire room. By understanding how to balance brightness with shadow and texture, you can transform a simple hallway into a breathtaking gallery that reflects your unique style and provides a warm embrace to everyone who enters.
Layering light is a fundamental secret in the world of interior design, yet it is often overlooked in favor of a single, powerful fixture. However, relying on just one light source can make a foyer feel flat, clinical, or even cave-like if the corners remain dark. When you layer your lighting, you are essentially building a three-dimensional environment that highlights architectural details, guides the eye toward beautiful decor, and ensures the space is functional for daily tasks. This guide will walk you through the professional secrets of layering, helping you choose the right fixtures to create an entryway that is as practical as it is beautiful.
Furthermore, the right lighting strategy can actually make a small entryway feel larger or a grand foyer feel more intimate. It is all about how the light interacts with the walls, floor, and ceiling. By using a combination of ambient, task, and accent lighting, you can control the narrative of your home’s entrance. Whether you prefer a modern minimalist look or a classic traditional aesthetic, the principles of layering remain the same, providing a roadmap to a professional-grade interior that feels curated and intentional.
Establishing the Foundation with Ambient Lighting
The first layer of any successful lighting plan is ambient lighting, which provides the overall illumination for the space. In an entryway, this is usually achieved through a central ceiling fixture that casts a wide, even glow. This primary light source ensures that the area is safe and easy to navigate, preventing trips over shoes or bags left near the door. For homes with high ceilings, a grand chandelier is often the preferred choice, as it fills the vertical volume of the room and draws the eye upward, emphasizing the height and grandeur of the architecture.
If your entryway has standard or lower ceilings, you might opt for a sophisticated flush mount or semi-flush mount fixture. These options provide plenty of light without encroaching on the physical space, making the room feel open and airy. The key to successful ambient lighting is to choose a fixture that complements the overall style of your home while providing enough lumens to brighten the entire area. Think of this layer as the “canvas” upon which you will paint with other, more focused light sources later in the design process.
In addition to providing general light, your ambient fixture serves as a major decorative element. It is often the first thing people notice, so it should make a statement. Whether it is a crystal-dripping masterpiece or a sleek, geometric pendant, this piece sets the tone for the rest of the house. When selecting your foundation light, consider the materials and finishes used elsewhere in your home to ensure a cohesive transition from the foyer into the living areas. This consistency creates a sense of flow that is hallmark of expert interior design.
Adding Depth and Character with Accent Lighting
Once you have established your base layer of light, it is time to add depth and drama through accent lighting. This layer is designed to highlight specific features within the entryway, such as a piece of artwork, an architectural niche, or a beautiful textured wall. Wall sconces are a favorite tool for designers in this regard. When placed on either side of a mirror or a piece of art, sconces create a sense of symmetry and draw attention to the focal point of the wall. They also add a secondary level of light that sits at eye level, which is much more flattering and inviting than overhead light alone.
Another way to incorporate accent lighting is through the use of directional spotlights or picture lights. If you have a gallery wall in your foyer, a dedicated picture light can make your favorite paintings or photographs pop, giving the space the feel of a high-end art gallery. Similarly, if your entryway features beautiful crown molding or unique stonework, grazing the wall with light from a hidden source can emphasize the textures and create interesting shadows. This interplay between light and dark is what gives a room its personality and makes it feel lived-in and sophisticated.
Furthermore, accent lighting helps to define the boundaries of the room. By illuminating the perimeter or specific decorative objects, you prevent the space from feeling like a dark tunnel. It encourages guests to linger and appreciate the details of your decor. When choosing accent fixtures, look for pieces that share a common finish with your main chandelier or pendant. This doesn’t mean they have to match perfectly, but having a shared element like a brass finish or a matte black frame will tie the different layers together for a professional, polished look.
The Importance of Task Lighting for Functionality
While beauty is important, an entryway must also be functional. This is where task lighting comes into play. Task lighting is focused light intended to help you perform specific activities, such as checking your reflection in the mirror, finding your keys on a console table, or reading the mail. In a foyer, task lighting is most commonly found in the form of table lamps. A pair of elegant lamps placed on a console table not only adds a decorative touch but also provides a warm, localized glow that is perfect for those moments when you don’t need the full brightness of the overhead light.
Table lamps offer a softer, more intimate light that can make a large foyer feel much more welcoming in the evening. They create a “pool” of light that grounds the furniture and makes the entryway feel like a deliberate room rather than just a hallway. When selecting lamps for your entryway, consider the height of the table and the scale of the room. A lamp that is too small will look lost, while one that is too large can overwhelm the space. Aim for a height that allows the bottom of the lampshade to be roughly at eye level when you are standing, ensuring the light is directed where you need it most.
Additionally, task lighting can be integrated into the architecture itself. For example, if you have a built-in bench or a “drop zone” for bags and shoes, under-cabinet lighting or small recessed puck lights can provide the necessary illumination to keep the area organized. By thinking about how you actually use your entryway on a daily basis, you can place task lights in a way that makes your life easier while adding another layer of visual interest to the design. This blend of utility and style is a secret weapon of successful interior decorators.
Mastering Scale and Proportion in Your Foyer
One of the most common mistakes homeowners make when choosing lighting is selecting fixtures that are the wrong size for the space. Scale and proportion are critical when layering your entryway lights. A chandelier that is too small will look like an afterthought, failing to provide the visual impact needed for a grand entrance. Conversely, a fixture that is too large can make the ceiling feel like it is closing in on you. A good rule of thumb for determining the diameter of your main light is to add the length and width of the room in feet; the sum is the approximate diameter the fixture should be in inches.
Height is equally important. In an entryway, the bottom of a hanging light fixture should typically be at least seven feet above the floor to ensure that taller guests can walk under it without concern. If you have a two-story foyer with a window above the door, you should aim to hang the chandelier so that it is centered within the window when viewed from the outside. This creates a beautiful “lantern” effect that welcomes you home before you even step inside. Paying attention to these measurements ensures that your lighting feels integrated into the architecture rather than just stuck onto the ceiling.
Similarly, when layering with sconces or lamps, consider the surrounding furniture and wall space. Sconces should generally be mounted about 60 to 64 inches from the floor, roughly at eye level. If you are placing them on either side of a mirror, ensure they are spaced far enough apart to illuminate your face evenly without creating harsh shadows. By carefully calculating the scale and placement of each layer, you create a balanced environment where no single element dominates, but every piece contributes to a harmonious whole.
Creating Atmosphere with Color Temperature and Dimmers
The secret to a truly professional-looking entryway often lies in the quality of the light itself, not just the fixtures. Color temperature, measured in Kelvins (K), plays a massive role in how a space feels. For a warm, inviting foyer, look for bulbs in the 2,700K to 3,000K range. This “warm white” light mimics the glow of traditional incandescent bulbs and creates a cozy, hospitable atmosphere. Cooler lights, which have higher Kelvin ratings, can often feel too clinical or harsh for a residential entryway, making the space feel cold and uninviting.
Consistency is also key. When layering your lighting, try to ensure that all the bulbs across your ambient, task, and accent layers have a similar color temperature. If your chandelier is a warm yellow and your sconces are a cool blue-white, the space will feel disjointed and confusing to the eye. By keeping the color temperature uniform, you create a seamless transition between the different layers of light, which enhances the overall sense of luxury and intentional design in your home.
Finally, never underestimate the power of a dimmer switch. Installing dimmers for your entryway lights allows you to change the mood of the space instantly. During the day, you might want full brightness to keep the area energetic and clear. In the evening, dimming the lights creates a soft, sophisticated ambiance that feels calm and relaxing. Dimmers also allow you to balance the different layers; for example, you can dim the overhead light and let the table lamps and sconces take center stage for a more dramatic, layered effect. This flexibility is essential for creating a home that adapts to your needs and the time of day.
Conclusion: Bringing Your Entryway Vision to Life
Layering your entryway lighting is an investment in your home’s overall atmosphere and functionality. By starting with a strong foundation of ambient light, adding character with accent pieces, and ensuring daily tasks are covered with focused lighting, you create a space that is both practical and stunning. Remember to pay close attention to scale, proportion, and color temperature, as these subtle details are often what separate a DIY project from a professional interior design. With the right approach, your foyer will become a beautiful preview of the style and warmth found throughout the rest of your home.
Ultimately, the goal of a well-lit entryway is to make you feel “at home” the moment you cross the threshold. It should be a space that greets you with warmth and leaves your guests impressed by your attention to detail. By using the secrets of layering and choosing high-quality fixtures that resonate with your personal taste, you can transform your entryway into a shining example of great design. Take the time to plan your layers, experiment with different heights and placements, and enjoy the process of crafting an entrance that is uniquely yours.
Preserving Your Investment: Professional Tips for Protecting Luxury Furniture and Decorative Homewear
Preserving Your Investment: Professional Tips for Protecting Luxury Furniture and Decorative Homewear
Investing in your home is more than just a simple purchase; it is about curating an environment that reflects your personality and status. When you source high-end pieces from a reputable provider like Tint by Designs, you are bringing a level of artistry and quality into your living space that deserves the utmost care. Luxury furniture and decorative homewear are designed to last for generations, but their longevity depends heavily on how you treat them. Without the right preservation techniques, even the finest materials can succumb to the wear and tear of daily life, losing their luster and value over time.
The secret to keeping a home looking brand new lies in understanding the specific needs of different materials. Whether you have a velvet-upholstered sofa, a hand-carved wooden dining table, or delicate ceramic accents, each item requires a tailored approach to maintenance. By following professional advice, you can protect your financial investment and ensure that your home remains a stunning sanctuary for years to come. In this guide, we will explore the best practices for safeguarding your luxury items against environmental factors, accidental damage, and the passage of time.
Transitioning from the initial excitement of a new interior design project to the long-term care of your items can feel overwhelming. However, once you establish a routine, it becomes second nature. Protecting your investment is not just about cleaning; it is about prevention and proactive management. Let’s dive into the essential strategies every homeowner should know to keep their high-end interiors in pristine condition.
Managing the Impact of Sunlight and Climate
One of the most silent yet destructive forces in a home is natural sunlight. While we all love a bright, airy room, the ultraviolet (UV) rays from the sun can cause significant damage to luxury furniture. Over time, constant exposure to direct sunlight leads to “photodegradation,” which causes fabrics to fade, wood to discolor, and leather to crack. If your favorite armchair sits right next to a large window, you might notice that the side facing the glass becomes several shades lighter than the rest of the piece within just a few years.
To combat this, you should consider professional window treatments that offer UV protection. High-quality curtains, blinds, or even UV-filtering window films can block the majority of harmful rays without sacrificing the natural light in your home. Furthermore, it is a good idea to rotate your furniture periodically. By moving pieces around the room, you ensure that no single side is bearing the brunt of the sun’s energy for too long. This simple habit can add years of vibrant color to your upholstery and keep your wood finishes looking rich and deep.
Humidity and temperature also play a critical role in the health of your furniture. Wood is a natural, porous material that breathes; it expands when the air is humid and contracts when it is dry. Extreme fluctuations can lead to warping, splitting, or joints becoming loose. Maintaining a consistent indoor climate with a humidifier or dehumidifier, depending on the season, is essential for preserving high-end woodwork. Aim for a steady humidity level between 40% and 50% to keep your investment stable and secure.
Mastering Fabric and Upholstery Maintenance
Luxury fabrics like velvet, silk, and high-grade linen offer a tactile experience that cheaper alternatives simply cannot match. However, these materials are also more sensitive to spills and dust. The first rule of thumb for fabric care is regular vacuuming. Dust particles are abrasive; when they settle into the fibers of your sofa and you sit down, those particles act like tiny pieces of sandpaper, wearing down the fabric over time. Using a soft brush attachment on your vacuum once a week will prevent this buildup and keep the texture feeling soft.
When it comes to spills, the key is to act quickly but gently. Never rub a stain, as this pushes the liquid deeper into the fibers and can damage the nap of the fabric. Instead, use a clean, white cloth to blot the area, absorbing as much liquid as possible. For luxury items, it is always best to consult the manufacturer’s cleaning codes or hire a professional service. Using the wrong chemical cleaner on a high-end piece can cause permanent ring marks or discoloration that is far worse than the original spill.
If you are looking for expert advice on which fabrics are best suited for your lifestyle, you can visit the experts at Tint by Designs. Their team understands the balance between aesthetic beauty and practical durability. They can help you select materials that not only look spectacular in your space but are also manageable based on how much traffic your home receives. Choosing the right fabric from the start is the most effective way to ensure your furniture stands the test of time.
Protecting Fine Wood and Stone Surfaces
Natural wood and stone are staples of luxury interior design, prized for their unique grains and textures. However, because they are natural materials, they are susceptible to etching, scratching, and staining. For wooden surfaces, always use coasters, trivets, and felt pads under decorative objects. Even a small ceramic vase can leave tiny scratches on a polished mahogany table if it is moved frequently. Furthermore, avoid placing hot plates or cold drinks directly on wood, as the heat or condensation can create white “cloud” marks that are difficult to remove.
Stone surfaces, such as marble or granite, are often mistakenly thought of as indestructible. In reality, marble is quite soft and highly reactive to acids. A simple spill of lemon juice or wine can “etch” the surface, leaving a dull spot that ruins the polished finish. To protect these surfaces, ensure they are properly sealed by a professional. A good sealer provides a temporary barrier that gives you time to wipe up spills before they penetrate the stone. Regularly cleaning with a pH-neutral cleaner specifically designed for stone will keep your countertops and tables sparkling.
Polishing your wood furniture is another area where many people make mistakes. Most experts recommend avoiding “all-purpose” spray waxes that contain silicone, as they can create a sticky buildup that attracts more dust. Instead, use a high-quality paste wax or a specialized furniture oil every few months. This nourishes the wood and provides a thin protective layer against moisture and dust. When you take the time to care for these surfaces properly, they develop a beautiful patina over the years rather than just looking worn out.
The Importance of Professional Interior Design Services
Many homeowners assume that interior design is only about the initial “look” of a room. However, professional designers play a massive role in the long-term preservation of your home. A professional service like Tint by Designs doesn’t just pick out pretty items; they evaluate the layout of your home to minimize wear and tear. They consider foot traffic patterns, the angle of the sun at different times of the day, and the compatibility of different materials. By planning the space correctly, they can prevent many of the issues that lead to furniture damage.
For example, a designer might suggest a specific rug placement to protect expensive hardwood floors or recommend a particular type of leather that is more resistant to pet claws. They also have access to “performance fabrics” that mimic the look of luxury silks and velvets but are engineered to be stain-resistant and incredibly durable. This expertise is invaluable when you are making a significant financial investment. They help you spend your money wisely on pieces that are appropriate for your specific environment.
Moreover, having a relationship with a professional design firm gives you a point of contact for maintenance advice. Whether you need a recommendation for a professional upholstery cleaner or help refinishing a family heirloom, their network of artisans and specialists is a huge asset. Investing in professional design services is essentially an insurance policy for your home’s aesthetic and functional longevity. They ensure that your vision for a beautiful home remains a reality for decades.
Caring for Decorative Homewear and Accents
While large furniture pieces get most of the attention, decorative homewear—such as vases, sculptures, and metal accents—also requires specialized care. These items are the “jewelry” of your home, and if they become tarnished or dusty, they can make the entire room look neglected. Metal accents, particularly brass and silver, will naturally tarnish over time due to exposure to air. Using a gentle metal polish specifically designed for the type of metal you have will restore its shine without stripping away the finish.
Ceramics and glassware should be handled with care, especially during cleaning. Dust them regularly with a microfiber cloth to prevent the buildup of grime. If a deeper clean is needed, avoid using abrasive sponges that can scratch the glaze. For intricate sculptures with hard-to-reach crevices, a soft-bristled makeup brush is an excellent tool for removing dust without risking damage to the piece. Always support the base of an object when moving it, rather than picking it up by a handle or a delicate extension.
Proper display is also a form of protection. Ensure that shelves are sturdy and not overloaded, and use “museum wax” on the bottom of small items if you live in an area prone to vibrations or have a busy household. This clear, removable wax keeps items from sliding or tipping over. By treating your decorative accents with the same respect as your larger furniture, you create a cohesive environment where every detail contributes to a sense of luxury and refinement.
Establishing a Consistent Maintenance Schedule
The best way to protect your investment is to stop thinking of maintenance as a “once-a-year” chore and start seeing it as a series of small, manageable habits. Consistency is the key to preventing minor issues from becoming major repairs. Create a simple checklist for your home: weekly dusting and vacuuming, monthly leather conditioning or wood polishing, and a yearly professional deep clean for rugs and upholstery. This proactive approach ensures that nothing gets overlooked.
It is also helpful to keep a “home manual” where you store the care instructions and receipts for all your major purchases. This makes it easy to refer back to the manufacturer’s recommendations when you aren’t sure how to treat a specific stain. Additionally, keeping these records can be beneficial for insurance purposes or if you ever decide to sell a piece of furniture as a vintage item in the future. Knowing exactly what a piece is made of and how it has been cared for adds to its resale value.
In conclusion, luxury furniture and decorative homewear are more than just objects; they are the foundation of your home’s atmosphere. By managing environmental factors, using the right cleaning techniques, and seeking professional guidance, you can preserve the beauty and value of these items indefinitely. Remember that a well-cared-for home is a reflection of the pride you take in your surroundings. If you are ready to enhance your living space with pieces that are built to last, or if you need expert design advice to protect your current collection, reach out to the professionals who understand quality best.
We invite you to explore the stunning collections and expert services available at Tint by Designs. Whether you are looking for that perfect statement piece or need a full interior design consultation, their team is dedicated to helping you create and maintain a home that is both beautiful and enduring. Visit them today to see how luxury and longevity go hand in hand.
Elevating Your Interior Design: Why Professional Painters are the Secret to a Perfect Home Makeover
Elevating Your Interior Design: Why Professional Painters are the Secret to a Perfect Home Makeover
When you decide to refresh your living space, you likely start by browsing for new cushions, elegant vases, or statement rugs that reflect your personal style. However, even the most beautiful decor can fall flat if the walls behind them are not perfectly finished. Achieving a flawless backdrop often requires the steady hand and technical knowledge of professional painters who understand how texture and finish interact with your overall design vision. By investing in quality craftsmanship from the very beginning of your project, you ensure that every piece of homewear you select later truly shines against a crisp, clean canvas. This foundational step is what separates a simple room refresh from a professional-grade home transformation.
In the world of interior design, the walls are much more than just structural boundaries; they are the stage upon which your life and style play out. Many homeowners underestimate the complexity of a high-quality paint job, thinking it is a simple weekend task. Yet, the difference between a DIY attempt and a professional application is often staggering. A professional touch provides a level of depth and consistency that is nearly impossible to replicate without years of experience. When you prioritize this aspect of your makeover, you are setting yourself up for long-term satisfaction with your home’s aesthetic.
Furthermore, a professional paint job acts as a bridge between your architectural features and your decorative items. Whether you are aiming for a minimalist modern look or a cozy traditional feel, the quality of the paint application dictates how light moves through the room. This light interaction is crucial for highlighting the textures of your fabrics and the colors of your decorative accents. By starting with a professional finish, you create a cohesive environment where every element feels intentional and high-end.
The Foundation of Every Great Design
Every interior designer will tell you that the “bones” of a room must be solid before you can focus on the finishing touches. While furniture and accessories are the jewelry of a home, the paint is the skin. If the skin is uneven, peeling, or poorly applied, the jewelry will never look its best. Professional experts bring a level of surface preparation that goes far beyond what most people do at home. They don’t just slap a new coat over the old one; they assess the health of the drywall, repair minor imperfections, and ensure a perfectly smooth surface that allows the color to look vibrant and true.
This preparation phase is actually the most important part of the entire process. It involves cleaning, sanding, patching, and priming in a way that ensures the new paint adheres properly and lasts for years. When these steps are skipped or rushed, the result is often visible brush marks, “orange peel” textures, or paint that begins to flake within months. By hiring experts, you are paying for their ability to create a laboratory-grade surface that makes the final color pop. This level of detail provides a sense of luxury that elevates even the most modest home.
Moreover, the foundation of your design also includes the choice of finish. Professionals can guide you through the differences between matte, eggshell, satin, and high-gloss finishes. Each of these has a specific purpose and can drastically change the mood of a room. For instance, a velvet-like matte finish might be perfect for a sophisticated bedroom, while a durable satin is better for a high-traffic hallway. Having an expert navigate these choices ensures that your walls don’t just look good, but also function perfectly for your specific lifestyle and the homewear products you plan to display.
Color Theory and Lighting Integration
Choosing a color from a small paper swatch is one of the most difficult tasks for any homeowner. A color that looks like a soft “seashell” in the store can quickly turn into a jarring “neon peach” once it covers four large walls. Professional painting services understand the science of color theory and how it interacts with both natural and artificial lighting. They can help you visualize how a specific shade will change throughout the day as the sun moves across your home. This insight is invaluable when you are trying to coordinate your walls with specific decorative pieces or furniture sets.
Lighting is the silent partner of interior design. A room with north-facing light will make colors appear cooler and bluer, while south-facing light can make them appear much warmer. Professionals know how to compensate for these shifts. They can suggest undertones that balance the light, ensuring that your room feels balanced and inviting at all hours. When your wall color is perfectly tuned to the light in your home, your decorative homewear—like metallic lamps or colorful throw pillows—will stand out with much more clarity and impact.
Additionally, the way color is applied affects how we perceive the size and shape of a room. Experts can use techniques like accent walls or “color drenching” to make a small room feel larger or a cavernous room feel more intimate. This strategic use of color creates a sense of flow that carries the eye from one decorative element to the next. Instead of the walls being a distraction, they become a supportive element that enhances the overall narrative of your interior design. This synergy between color, light, and decor is the hallmark of a truly well-designed home.
The Technical Edge: Tools and Techniques
One of the biggest advantages of working with professionals is their access to high-end tools and advanced application techniques. While a standard roller and tray might get the job done, they often leave behind subtle imperfections. Professionals use specialized equipment, such as high-volume, low-pressure sprayers for cabinetry or high-quality brushes that leave zero streaks on trim and molding. These tools allow for a level of precision that is especially important when you are dealing with intricate architectural details like crown molding or wainscoting.
Beyond the tools themselves, the technique of “cutting in” is where the pros really shine. This is the process of painting the edges along ceilings, baseboards, and corners without using tape. While many DIYers rely heavily on blue tape, professionals often have the steady hand to create razor-sharp lines that look much cleaner. These sharp lines create a frame for your room, making everything inside that frame look more expensive and well-maintained. When you look at a professionally painted room, you notice a crispness that gives the space a “new construction” feel, regardless of the home’s actual age.
Furthermore, professionals are well-versed in the latest paint technologies. They know which products are low-VOC (volatile organic compounds) for better air quality and which ones offer “scuff-shield” technology for homes with pets and children. They also understand the chemistry of different paint types, ensuring that a water-based paint isn’t applied over an old oil-based layer without the proper transition primer. This technical knowledge prevents common disasters like bubbling or peeling, saving you from the headache of having to redo the entire project a year later.
Creating a Cohesive Narrative with Decor
Once the walls are professionally finished, the fun of decorating truly begins. A high-quality paint job acts as a unifying force for all your decorative homewear. If you have a collection of eclectic art, a neutral, expertly applied backdrop allows the art to be the star of the show. If you prefer a monochromatic look, the subtle variations in texture and sheen provided by a pro will add the necessary depth to keep the room from feeling flat. The relationship between the walls and the objects in the room should be one of harmony, not competition.
Think of your home as a gallery. Galleries spend a significant amount of time and money ensuring their walls are flawless because they know that any imperfection will distract the viewer from the art. The same logic applies to your home. When you place a high-end decorative vase on a sideboard, you want the viewer’s eye to be drawn to the craftsmanship of the vase, not a drip of paint on the wall behind it. Professional finishes provide that “gallery feel,” making every item you’ve carefully curated for your home look its absolute best.
Moreover, a professional can help you execute more complex design ideas, such as ombre effects, geometric patterns, or sophisticated lime washes. These techniques are currently very popular in high-end interior design but are incredibly difficult to pull off as a DIY project. By working with experts, you can incorporate these trendy elements into your home with confidence, knowing they will look intentional and polished. This allows you to be more creative with your homewear choices, as you have a sophisticated foundation that can handle bolder design risks.
Efficiency, Value, and Peace of Mind
Many people hesitate to hire professionals because of the cost, but when you factor in the value of your time and the cost of mistakes, it is often the more economical choice. A professional crew can finish a project in a fraction of the time it would take an amateur. This means your home isn’t a construction zone for weeks on end. You can get back to enjoying your space and arranging your new decor much faster. The efficiency of a professional team allows for a seamless transition from the “messy” phase of a makeover to the “styling” phase.
From a financial perspective, a high-quality paint job is one of the highest-return investments you can make in your property. If you ever decide to sell, potential buyers will immediately notice the quality of the finishes. A home that looks professionally maintained commands a higher price and sells faster. It signals to the buyer that the home has been cared for with attention to detail. Even if you aren’t planning to sell, the durability of professional-grade products and application means you won’t have to repaint for a much longer time, saving you money in the long run.
Finally, there is the undeniable benefit of peace of mind. Home renovations are notoriously stressful. By delegating the painting to experts, you remove one of the most physically demanding and messy tasks from your to-do list. You don’t have to worry about cleaning up spills, climbing tall ladders, or disposing of leftover chemicals. Instead, you can focus on the creative aspects of interior design, such as selecting the perfect homewear and arranging your furniture to create the ultimate sanctuary. This peace of mind allows you to actually enjoy the process of transforming your home.
Conclusion: The Final Touch of Excellence
In conclusion, while it might be tempting to view painting as a secondary concern in your home makeover, it is actually the most critical element for success. A professional finish provides the quality, durability, and aesthetic precision that DIY projects simply cannot match. It sets the tone for your entire interior design, ensuring that your furniture, lighting, and decorative accessories are presented in the best possible light. By choosing to work with experts, you are investing in the long-term beauty and value of your home.
The secret to a perfect home makeover lies in the balance between high-quality products and expert labor. When you pair beautiful decorative homewear with the flawless work of professional painters, you create a space that feels both personal and polished. Your home should be a reflection of your best self, and nothing says “excellence” like walls that have been treated with care and expertise. So, as you plan your next interior design project, remember that the most impactful change you can make starts with the very surface of your home. Give your space the foundation it deserves, and watch as your entire design vision comes to life with stunning clarity.